Hazards[]
| Hazards | Applicable Ability |
|---|---|
| Elemental Effectiveness | - |
| Obstructors | |
| Damage Walls | Null Damage Wall |
| Warps | Null Warp |
| Magic Circles | Null Magic Circle |
| Drones | Can't be broken |
| Revivers |
Overall Strategy[]
Bring All Pierce Null Damage Wall Monsters
The main hazards are Damage Walls and Bounce Obstructors. Therefore you need all Pierce Null Damage Wall monsters. You can deal with only 3 NDW monsters but you have to turn adjust so that the non-NDW monster will start on the first turn.
Defeat Mobs Within 9 Turns
Before the Boss Stages, the Drone has a 9 Turn Volatile Blast that can nearly one-shot you. Since the Drone cannot be broken, even with Drone Breakers, you need to clear all the mobs within 9 Turns
3rd Stage has Higher HP Obstructors
Only on the 3rd Stage, the Obstructors' HP is higher. In order to one-shot them, you need a Fire monster whose ATK can reach 31,935 after Gauge.
Viable Monsters[]
| S Rank | Reason |
|---|---|
 Hatcher |
Azazel (Ascension) - Pierce, Null Damage Wall + Null Magic Circle - Speed Up helps allies mob clear effectively - 12 Command SS can be used multiple times |
 Hatcher |
Coral (Evolution) - Pierce, Null Damage Wall - 8 Turn SS can be used to avoid Magic Circles and one-shot the 3rd Stage |
 Hatcher |
Sherry Blawesome (Evolution) - Pierce, Null Damage Wall - Needs Class Kinstrength S to one-shot the 3rd Stage |
| A Rank | Reason |
 Hatcher |
Crimson Oraternative Dragon - Pierce, Null Damage Wall - Breath for damage towards the Boss - Bash SS can be used on Bounce Obstructors during Boss Stages |
 Drop |
Doraemon - Pierce, Null Damage Wall - Bash SS can be used on Bounce Obstructors during Boss Stages |
 Hatcher |
Sakamoto Ryoma (Evolution) - Pierce, Null Damage Wall - Command SS for mob clearing and Boss damage |
 Hatcher |
Spider-Man (Ascension) - Pierce, Null Damage Wall - SS can be used to do more damage |
 Drop |
Avalon - Pierce, Null Damage Wall - High SPD can clear the Bounce Obstructors effectively |
| B Rank | Reason |
 Hatcher |
Emil Sorge (Ascension) - Pierce, Null Damage Wall + Etherean Slayer XL - Can one-shot the Bounce Obstructors, even on the 3rd Stage |
 Hatcher |
Juliet (Evolution) - Pierce, Etherean Slayer L + Null Damage Wall - Can one-shot the Bounce Obstructors, even on the 3rd Stage |
 Hatcher |
Lady Shizuka (Ascension) - Pierce, Null Damage Wall - SS can be used to deal more damage |
 Hatcher |
Sherry Blawesome (Ascension) - Pierce, Null Damage Wall - One-way Laser for Boss damage |
 Hatcher |
Azazel (Evolution) - Pierce, Null Damage Wall - Bump Combo can finish off mobs |
| C Rank | Reason |
 Hatcher |
Alice (Ascension) - Pierce, Null Damage Wall + Recovery - Keeps HP topped off |
 Hatcher |
Jekyll & Hyde (Ascension) - Pierce, Null Damage Wall + Null Magic Circle - Command SS for mob clearing and Boss damage |
 Hatcher |
Agnamut (Transcension) - Pierce, Null Damage Wall - Meteor SS can deal damage to both the Boss and mobs |
 Hatcher |
Ultraman Taro - Pierce, Wood Resistance + Null Damage Wall - High SPD can clear the Bounce Obstructors effectively |
 Hatcher |
Lin Zi (Transcension) - Pierce, Etherean Slayer L + Null Warp - Can one-shot the Boss through the Obstructors - Start off each stage with Lin Zi |
| D Rank | Reason |
 Hatcher |
Sakamoto Ryoma (Transcension) - Pierce, Wood Slayer - Can one-shot the Obstructors on the 3rd Stage - Start off each stage with Ryoma |
 Hatcher |
Himiko (Evolution) - Bounce. Wood Slayer + Null Damage Wall - Ex Laser XL for damage |
 Drop |
Mikumo (Evolution) - Pierce - 8 Turn All Null SS can avoid the Damage Walls |
 Drop |
Shen Gongbao (Ascension) - Pierce, Null Damage Wall - SS increases her damage to enemies |
 Drop |
Fire Noel (Evolution) - Pierce, Null Damage Wall - Bump Combo can finish off mobs |
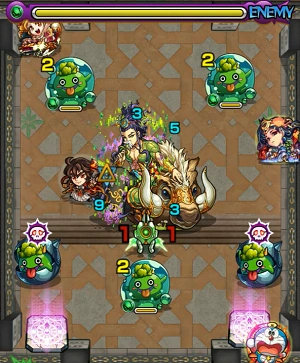
1st Stage - Clear in One Shot[]
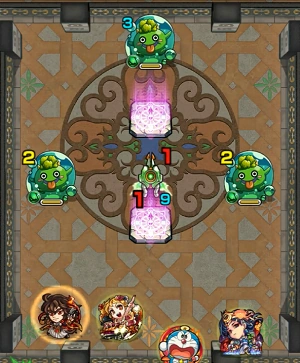
Progression Order
1. Defeat the Bounce Obstructors within 9 turns
Every turn, the drone will revive all the enemies. You will have to clear all the Obstructors in one turn. After 9 turns, the drone will deal a near OHKO Volatile Blast so you have to move on by that time.
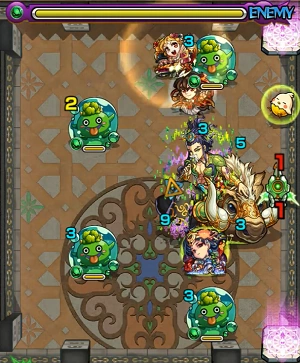
2nd Stage - Start from the Pierce Obstructors[]
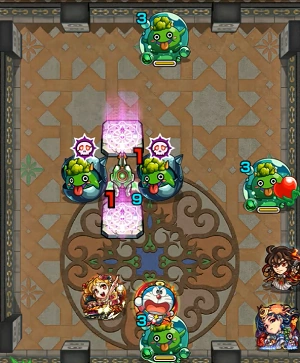
Progression Order
1. Defeat the Pierce Obstructors
2. Defeat the Bounce Obstructors within 9 turns
On this stage, there are Pierce Obstructors. Your Pierce monsters will be able to one-shot them as long as they are not Chicks. After they are gone, take care of the Bounce Obstructors. Try to have as few as many monsters in Chick form for the next stage.
3rd Stage - Clear in Two Shots[]
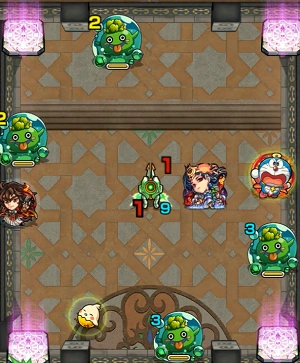
Progression Order
1. Defeat the Bounce Obstructors within 9 turns
In this stage, the Obstructors have higher HP than the previous Obstructors so you won't be able to one-shot them. Clear the Obstructors in two shots.
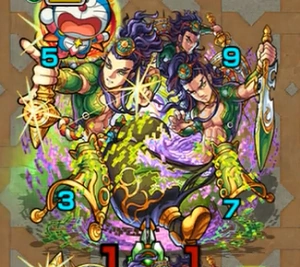
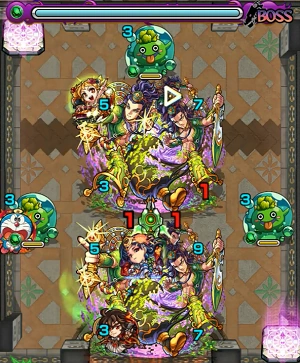
4th Stage - Attack Marishiten on Turn 1[]
| Placement | Attack |
|---|---|
| Top Right (5 Turns) |
Lock-on Laser ~8000 per hit |
| Bottom Right (3 Turns) |
Cross Laser ~4500 per hit |
| Top Left (3 Turns) |
Wind (Inwards) |
| Bottom Left (9 Turns) |
Lightning ~55000 total |
Marishiten's HP: 2.0 Million
Progression Order
1. Attack Marishiten on Turn 1
2. Defeat Bounce Obstructors while damaging Marishiten
On the first turn, the Obstructors will not attack so you have a free turn to deal damage to Marishiten. Afterwards, clear the Bounce Obstructors while damaging Marishiten. Make sure you don't attack the Pierce Obstructors since they will damage you and get revived back.
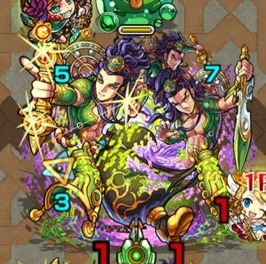
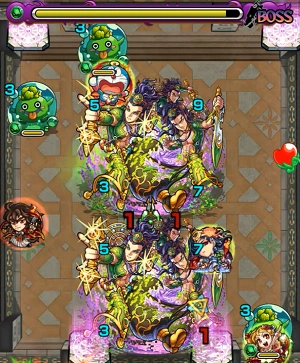
5th Stage - Use SS If Needed[]
Marishiten's HP: 2.0 Million
Progression Order
1. Attack Marishiten on Turn 1
2. Clear Bounce Obstructors while damaging Marishiten
Do the same thing as the previous stage by focusing onto Marishiten on Turn 1. The big difference is that 3 Bounce Obstructors will be revived/summoned every turn (to the max of 7). You have to consistently clear Obstuctors before they grow too many in numbers. Use SS if you need to clear off mobs or to finish off Marishiten.
Marishiten's Attack Pattern[]
Real and Transparent Marishiten[]
| Placement | Attack |
|---|---|
| Top Right (9 Turns) |
OHKO |
| Bottom Right (7 Turns) |
DEF Up All enemies besides self |
| Top Left (5 Turns) |
Energy Circle ~3000 per hit |
| Bottom Left (3 Turns) |
Homing Shot ~6500 total |
Clone Marishiten[]
| Placement | Attack |
|---|---|
| Top Right (7 Turns) |
Volatile Blast ~5000 per monster |
| Bottom Right (1 Turn) |
Recovery |
| Top Left (5 Turns) |
Warps |
| Bottom Left (3 Turns) |
Wind (Inwards) |
1st Boss Stage - Focus on the Bounce Obstructors[]
Marishiten's HP: 2.4 Million
Progression Order
1. Attack the Bounce Obstructors to deplete Marishiten's HP
2. Defeat the remaining Obstructors after Marishiten is defeated
The damage towards Bounce Obstructors and Marishiten are linked so all you have to do is to attack the Obstructors. The main Marishiten (the bottom one) is transparent so your monsters can pass through him.
2nd Boss Stage - Don't Attack the Pierce Obstructors[]

Marishiten's HP: 3.3 Million
Progression Order
1. Attack the Bounce Obstructors to deplete Marishiten's HP
2. Defeat the remaining Obstructors after Marishiten is defeated
Just like the first Boss stage, aim for the Obstructors. The Marishiten in this stage is transparent so don't mistakenly aim to bounce off of him. The Pierce Obstructors does a powerful homing shot so try to not attack them.
3rd Boss Stage - Use SS On the Bounce Obstructors[]
Marishiten's HP: 6.0 Million
Progression Order
1. Use SS on the Bounce Obstructors to defeat Marishiten
Marishiten has a ton of HP so the best way is to use SS to damage all the Obstructors at once. The real/transparent Marishiten is the top one.